You fire off a text prompt hoping for an epic movie scene. The composition actually turns out solid, but then you zoom in, and there it is—that unmistakable artificial gloss. The skin looks like smooth plastic, the lighting is perfectly symmetrical but entirely flat, and the background feels like a video game render. Unsurprisingly, this happens because AI models inherently default to a beautified, generic aesthetic.
If you want to break the algorithm’s bias and achieve true photorealism, you have to stop prompting like a digital artist and start prompting like a Director of Photography. I’ve found that Midjourney does not just understand basic colors and shapes. It possesses a deep, nuanced understanding of physical camera equipment, celluloid film stocks, and complex studio lighting setups.
That’s where things get interesting. I put together this guide to give you the exact terminology, negative parameters, and architectural prompt formulas required to master cinematic realism in modern AI image generators like Midjourney v7. By explicitly defining your shot sizes, camera angles, and optical flaws, you can actually force the AI to render frames indistinguishable from high-end Hollywood productions.
Table of Contents
- Essential Shot Sizes and Camera Angles
- Lenses and Focal Lengths
- Lighting: The Heart of Cinema
- Film Stocks and Color Grading
- The Director’s Cut: Referencing Filmmakers
- The Cinematic Prompt Formula
- Negative Prompts to Kill the “Plastic” Look
- Troubleshooting: Why Your Images Still Look Fake
- Frequently Asked Questions (FAQ)
1. Essential Shot Sizes and Camera Angles
The most common mistake I see in AI generation is leaving the camera placement up to the algorithm. When you don’t define the framing, Midjourney gets lazy and defaults to a standard medium shot taken from eye level. To build a cinematic sequence that actually feels real, you must dictate exactly where the virtual camera is positioned.
If you rely on our Text-to-Image Prompt Formulas, you already know the drill: establishing the visual hierarchy early in the text string is critical. Your camera angles should always appear right up front in the first quadrant of your prompt.
Shot Sizes
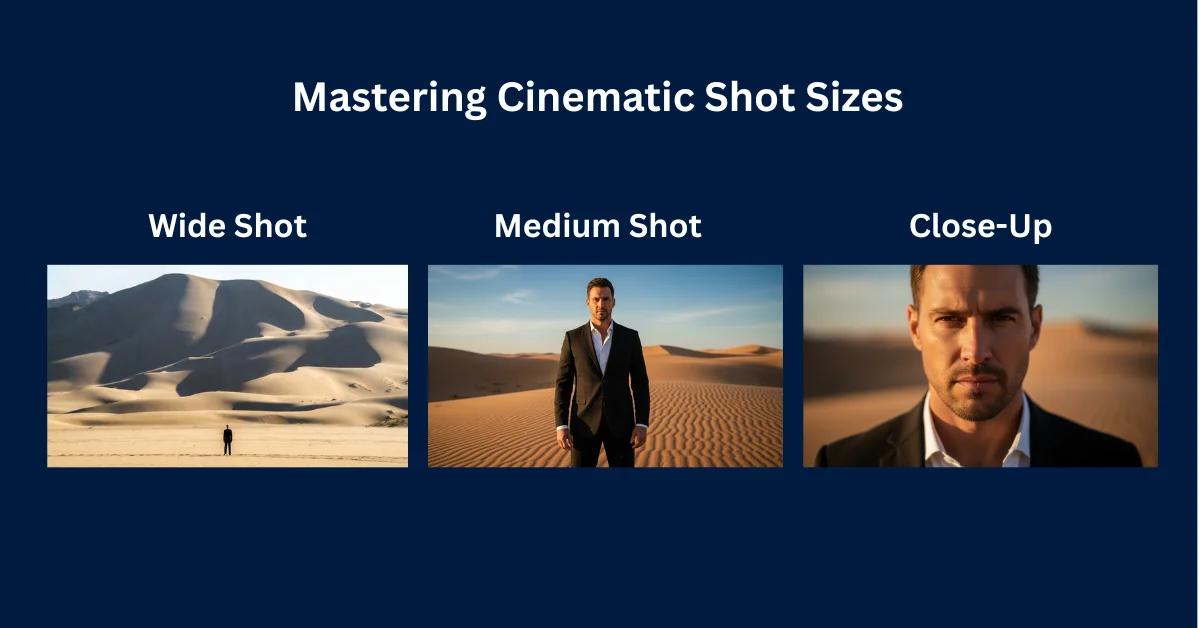
- Extreme Wide Shot (EWS): I use this to establish the geography of a scene. Your character will be tiny, swallowed up by a massive landscape or cityscape.
- Wide Shot (WS) / Full Shot: This shows the entire character from head to toe, anchoring them firmly within their immediate environment.
- Medium Shot (MS): This frames the subject from the waist up. It’s the standard narrative shot used for dialogue and casual interaction.
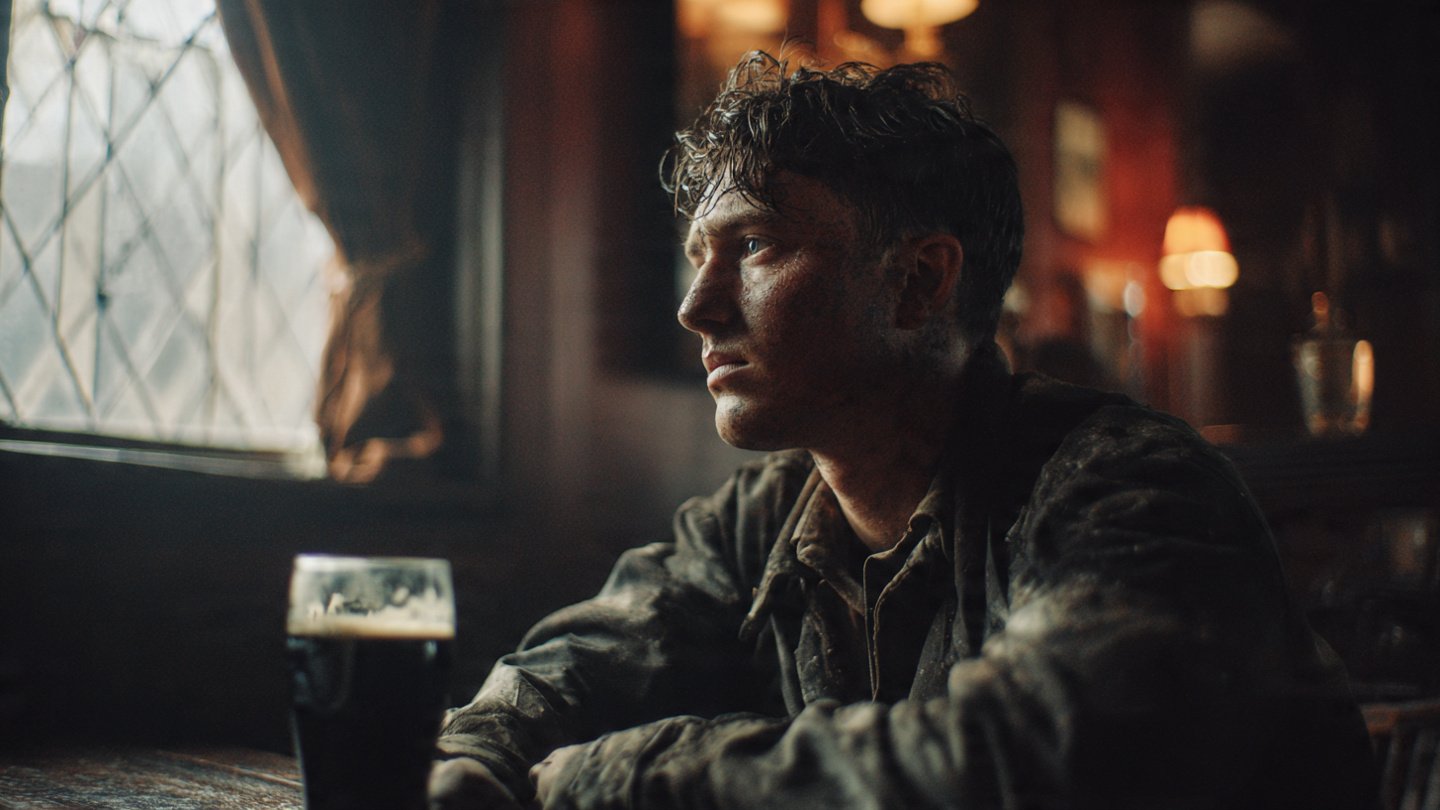
- Close-Up (CU): Here, you frame the subject’s face and shoulders. Use this when you want to capture subtle emotional expressions and highly detailed skin textures.
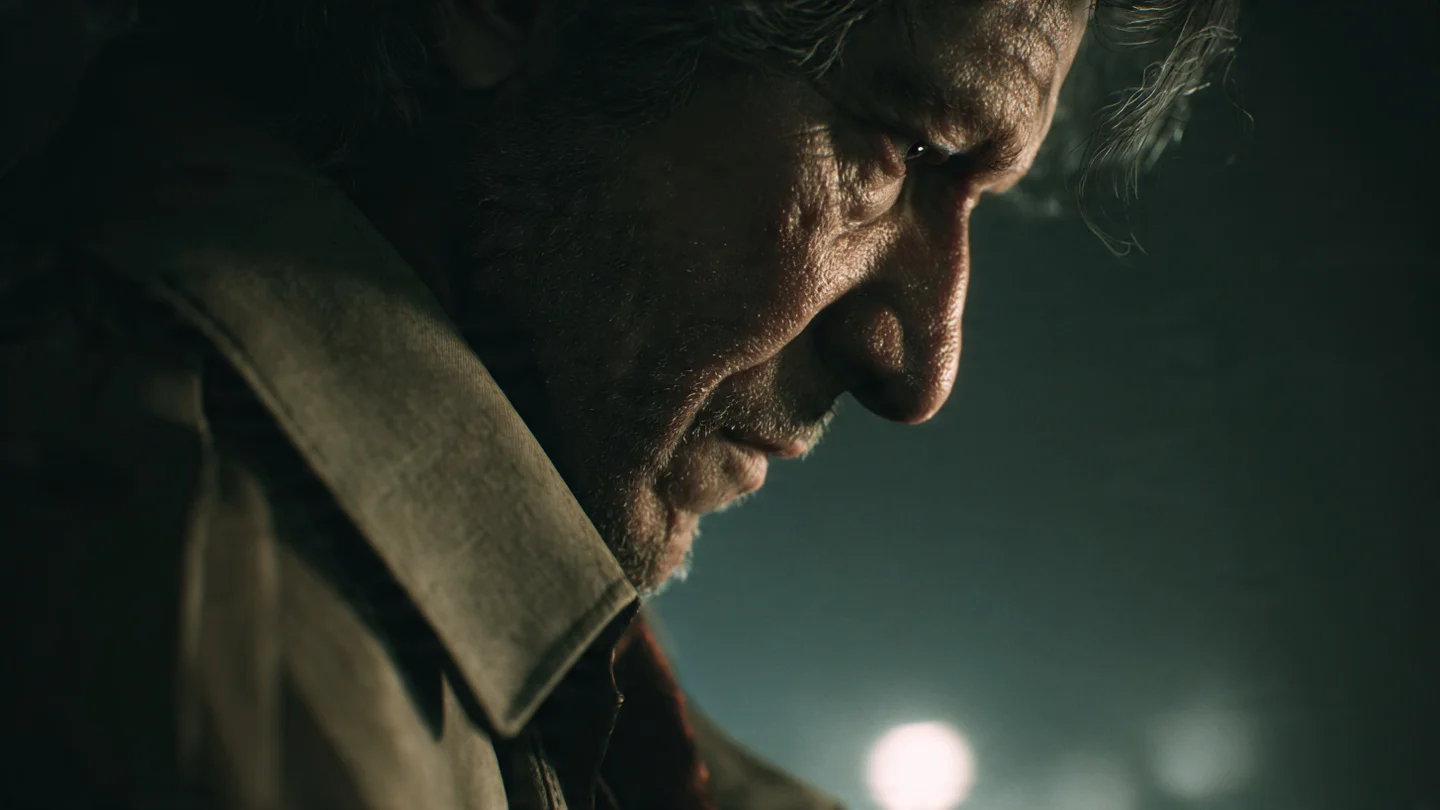
- Extreme Close-Up (ECU): This focuses entirely on a specific detail—think an eye, a trembling lip, or a finger resting on a trigger.
Camera Angles
- Low Angle: The camera is placed below the subject pointing upward. This makes the character look dominant, heroic, or deeply intimidating.
- High Angle: The camera points down at the subject. This visually diminishes the character, making them look vulnerable or isolated.
- Dutch Angle: The camera is tilted on its roll axis. I love using this to create a sense of psychological unease, disorientation, or chaotic action.
- Over-the-Shoulder (OTS): Places the camera behind one character looking at another. This is essential for establishing intimacy and spatial relationship in dialogue scenes.
- Bird’s-Eye View / Drone Shot: Looking directly down from a high altitude. Perfect for mapping out complex architectural spaces or massive crowds.
2. Lenses and Focal Lengths
A camera lens physically alters how space and depth are perceived in an image. I noticed that simply specifying a focal length in millimeters (mm) forces Midjourney to replicate optical physics, instantly elevating the realism of your generation.
Here’s the trick: for the best results, pair your focal length with an aperture setting (f-stop). A lower f-stop like f/1.4 creates a beautiful shallow depth of field, heavily blurring the background (bokeh) while keeping your subject razor-sharp.
14mm to 24mm (Ultra-Wide Lenses)
Ultra-wide lenses capture a massive field of view but distort the edges of the frame. They stretch lines and make objects close to the camera appear disproportionately large. Use these focal lengths for cramped interiors, sweeping landscapes, or surreal, highly distorted action shots.
35mm (The Cinematic Standard)
The 35mm lens is the workhorse of Hollywood cinematography. It closely mimics the natural human field of view while allowing just enough background into the frame to provide environmental context. If you want a standard, narrative documentary feel, explicitly prompt for a 35mm lens.
50mm (The Nifty Fifty)
This focal length offers zero optical distortion. It renders subjects exactly as the human eye sees them. I find it highly versatile, and it works exceptionally well for medium shots and standard environmental portraits.
85mm to 135mm (Portrait Lenses)
These are your telephoto lenses. They exhibit “lens compression,” which visually pulls the background closer to the subject while completely flattening facial features for a highly flattering look. Try combining an 85mm lens with a fast f/1.8 aperture to isolate your subject against a beautifully blurred background.
Anamorphic Lenses
Anamorphic lenses squeeze a wide image onto a standard film frame, creating distinct optical artifacts. Prompting for “anamorphic lens” or “anamorphic lens flare” will generate those distinct horizontal blue light streaks and oval-shaped background bokeh. This is my absolute favorite shortcut for a high-budget sci-fi aesthetic.
3. Lighting: The Heart of Cinema
Amateur AI prompts rely on generic terms like “good lighting” or “beautiful lighting.” The harsh truth? These phrases mean absolutely nothing to a neural network. To achieve genuine realism, you must use industry-standard terminology found in professional film lighting techniques.
Volumetric Lighting
Volumetric lighting refers to light beams made visible by atmospheric particles like dust, smoke, or fog. Prompting for “heavy volumetric lighting piercing through a dusty window” creates immediate depth and texture. It stops the air in your scene from looking artificially empty.
Rembrandt Lighting
Named after the legendary painter, this lighting setup places a primary light source at a 45-degree angle to the subject. It illuminates one half of the face while leaving the other half in shadow, save for a small, distinct triangle of light on the cheek. I use this all the time for highly dramatic, emotional close-ups.
Cinematic Rim Lighting
Rim lighting (or backlighting) places a strong light source directly behind the subject, outlining their silhouette with a glowing edge. This visually separates the character from a dark background. Combining a warm key light on the face with a cool blue rim light on the shoulders creates that classic Hollywood “orange and teal” color contrast.
Chiaroscuro
An Italian term meaning “light-dark,” chiaroscuro relies on extreme, high-contrast lighting. The subject is brightly illuminated against a pitch-black environment. This technique is perfect for neo-noir thrillers, horror scenes, and brooding character studies.
4. Film Stocks and Color Grading
Digital sensors capture clean, mathematically perfect images. Real celluloid film, on the other hand, captures light with chemical imperfections, film grain, and specific color shifts. I’ve found that instructing Midjourney to mimic specific analog film stocks immediately strips away the plastic digital aesthetic.
So instead of typing “make it look like an old movie,” invoke the exact brand and ISO of the film stock you want the model to replicate.
- Kodak Portra 400: The gold standard for portrait photography. It yields incredibly accurate, warm, and natural skin tones with very fine grain. Perfect for daytime dramas and character pieces.
- Cinestill 800T: A tungsten-balanced film stock famous for its “halation” effect—a distinct red glowing halo around bright light sources. It is heavily utilized in modern cyberpunk and nighttime neon photography.
- Fujifilm Superia X-TRA 400: Known for its slightly cool, green-leaning shadows and punchy reds. Excellent for gritty, urban street scenes and grungy aesthetics.
- Kodak Tri-X 400: A legendary black-and-white film stock. It produces high-contrast monochromatic images with heavy, noticeable film grain. Ideal for film noir and historical period pieces.
- Technicolor: The vibrant, highly saturated three-strip color process used in classic 1950s Hollywood cinema. It produces popping primary colors and a slightly surreal, dreamlike atmosphere.
5. The Director’s Cut: Referencing Filmmakers
If you’re struggling to combine lighting, lenses, and film stocks manually, you can use an algorithmic shortcut. Midjourney has digested millions of tagged movie stills, meaning it deeply understands the visual signatures of famous directors and cinematographers.
By simply appending “Directed by [Name]” or “Cinematography by [Name]” to your prompt, the AI will automatically apply that filmmaker’s preferred focal lengths, color palettes, and lighting setups.
- Roger Deakins: Invoking Deakins (Blade Runner 2049, 1917) results in stunning use of silhouettes, deep orange and teal color palettes, and flawless practical lighting setups.
- Denis Villeneuve: Produces brutalist, vast, and atmospheric landscapes with muted, desaturated color grades and overwhelming scale.
- Wes Anderson: Forces the AI into extreme, obsessive symmetry, flat wide-angle framing, and pastel color palettes (pink, yellow, and baby blue).
- Wong Kar-wai: Yields incredibly moody, romantic, step-printed slow-motion aesthetics with heavy neon greens, reds, and motion blur.
- Zack Snyder: Triggers high-contrast, heavily desaturated visuals with excessive film grain, dark shadows, and an ultra-shallow depth of field.
The best part? You can mix and match these references. For example, generating a sci-fi scene “Directed by Wes Anderson” will yield a highly unique, symmetrical, pastel spaceship interior. It’s wild to see in action.
6. The Cinematic Prompt Formula
To prevent the AI from jumbling your instructions, you must structure your text properly. Generative models read sequentially, prioritizing words at the beginning. If you need a hand automating this structure, you can run your base concepts through a Midjourney Prompt Generator to ensure the syntax aligns perfectly with the model’s engine.
Here is the structural framework I use for all cinematic generations:
[Shot Size + Camera Angle] + [Subject Description] +[Action/Emotion] + [Environment/Setting] + [Time of Day/Weather] + [Lighting Setup] +[Camera Lens + Film Stock] + [Director/Cinematographer Reference] + [Parameters]Example 1: The Gritty Neo-Noir Thriller
Medium close-up, low angle shot of a rugged detective with a faint facial scar, wearing a wet trench coat. He is looking suspiciously off-camera. Standing in a rain-slicked, narrow cyberpunk alleyway at midnight. Heavy volumetric fog, harsh cinematic rim lighting from a pink neon sign, deep shadows. Shot on 85mm anamorphic lens, f/1.8, Cinestill 800T, cinematography by Roger Deakins, photorealistic, 8k resolution --ar 2.39:1 --style raw --v 7Example 2: The Historical Period Drama
Wide shot, eye-level framing of a Victorian woman in an ornate crimson dress, holding a worn leather book. She is sitting in a dusty, dimly lit grand library with towering wooden bookshelves. Golden hour sunlight streaming through a large stained glass window. Soft Rembrandt lighting on her face, visible dust motes in the air. Shot on 35mm lens, f/4, Kodak Portra 400, directed by Joe Wright, natural film grain, cinematic realism --ar 16:9 --style raw --v 7Example 3: The Sci-Fi Isolation Shot
Extreme wide shot, bird's-eye view looking down at a lone astronaut in a battered white spacesuit. Trudging slowly across a desolate, black volcanic landscape. Overcast, diffuse lighting, moody atmosphere. High contrast, muted desaturated colors. Shot on 14mm ultra-wide lens, Kodak Tri-X 400, directed by Denis Villeneuve, cinematic masterpiece --ar 21:9 --style raw --v 77. Negative Prompts to Kill the “Plastic” Look
Even when I nail the positive prompting, Midjourney occasionally slips into its default digital art habits. To guarantee absolute realism, you have to aggressively tell the model what it is not allowed to generate. You do this using the --no parameter at the very end of your prompt.
A negative prompt forces the neural network to exclude specific visual tokens from its generation calculations. When I’m aiming for photorealism, I make sure to explicitly ban 3D rendering engines, digital smoothing algorithms, and artificial lighting setups.
Feel free to copy and paste this universal cinematic negative prompt string to the end of your instructions:
--no 3d render, CGI, octane render, unreal engine, smooth skin, plastic, airbrushed, digital painting, illustration, cartoon, anime, overexposed, blown out highlights, artificial lighting, mutated anatomy, deformed, watermark, text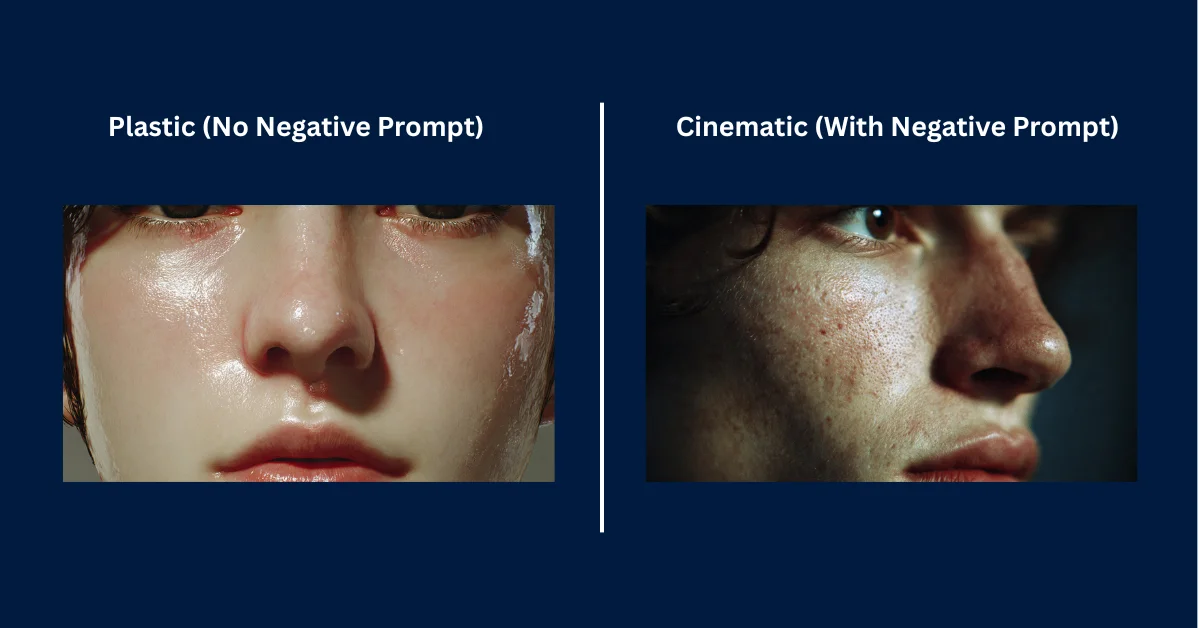
I always pair my negative prompt with the –style raw parameter. Midjourney v7 has a heavily stylized default setting for artistic exploration, and appending --style raw tells the engine to bypass its internal beautification filters and adhere strictly to the literal text of your prompt.
8. Troubleshooting: Why Your Images Still Look Fake
So what happens if you’ve implemented the cinematic formula, applied specific lenses, and used negative prompts, but your image still feels slightly “off”? In my experience, you’re likely making one of three common technical errors.
- You’re ignoring Aspect Ratios: Cinematic frames are never square. If you don’t use the
--arparameter, Midjourney just defaults to a 1:1 square image. Movies are shot in widescreen. You absolutely must use--ar 16:9(standard widescreen) or--ar 2.39:1(anamorphic ultra-widescreen) to properly trigger the model’s cinematic training data. - Your prompts are too long: Midjourney parses text sequentially and quickly loses focus if you write a 200-word essay. If you over-describe every single button on a character’s jacket, the AI is going to prioritize the jacket over the lighting and camera lenses. I always try to keep my prompts punchy and under 60 words for maximum impact.
- You’re asking for impossible physics: If you prompt for an “extreme wide shot” but demand an “extreme shallow depth of field with a blurred background,” the AI will glitch out. Optical physics dictates that wide-angle lenses generally keep everything in focus. If you force contradictory technical instructions, the AI has no choice but to generate a composite image that looks artificially stitched together.
9. Frequently Asked Questions (FAQ)
What aspect ratio is best for cinematic Midjourney images?
For standard modern television and web video framing, you’ll want to use the parameter --ar 16:9. If you want a highly dramatic, ultra-widescreen cinematic look mimicking anamorphic theater projections, go with the parameter --ar 2.39:1 or --ar 21:9.
Why are my Midjourney faces too smooth and plastic?
Midjourney’s default aesthetic heavily airbrushes human skin. To fix this, you have to append the --style raw parameter to the end of your prompt to reduce the default beautification. Additionally, I make sure to explicitly prompt for “skin texture, pores, facial imperfections, natural skin” and use a strong negative prompt like --no smooth skin, plastic, airbrushed.
How do I make Midjourney images look like old vintage films?
To achieve a vintage cinematic look, you must prompt for specific older film stocks and physical lens damage. Try adding phrases like “shot on Kodak Tri-X 400” or “Technicolor.” Furthermore, I recommend requesting physical artifacts by adding “heavy film grain, light leaks, dust, scratches, vintage 1970s film aesthetic.”
What does the –style raw parameter do in Midjourney v7?
The --style raw parameter tells Midjourney to dial back its default artistic stylization. Instead of trying to make the image look like a polished piece of digital concept art, the model will follow your text prompt much more literally. The result is flatter, more photographic, and ultimately more realistic outputs.
How do I maintain character consistency across cinematic shots?
To keep the same actor or subject across multiple environments in Midjourney v7, I rely on the Omni Reference parameter. Just append --oref [URL] to the end of your prompt. This locks the subject’s exact facial structure and characteristics while still allowing you to alter the lighting, camera angles, and background.
The Verdict
Ultimately, treating Midjourney like a digital camera rather than a magic paintbrush is the best way to dodge the platform’s default plastic look. It takes more upfront work to dial in the exact lenses, lighting, and film stocks, and you’ll still occasionally generate a weirdly stitched composite if you ask for impossible physics. But once you lock in these cinematic parameters, the level of realism is hard to argue with. As AI models continue to evolve, understanding the underlying rules of traditional photography will only become more valuable for steering them exactly where you want.