If you’ve ever tried building a comic book or spinning up a consistent brand mascot with generative AI, you know the exact flavor of this frustration. You finally coax the algorithm into generating the perfect protagonist. But the second you ask it to make them sit down or swap their jacket, they morph into an entirely unrecognizable stranger.
For years, I relied on messy workarounds. We’d blend celebrity faces, keep massive, unhinged spreadsheets of seed numbers, or resort to sketchy third-party face-swapping tools just to fix the endless variations. It was exhausting.
The introduction of native character referencing completely rewired how Midjourney parses identity. Instead of guessing at a text description from scratch every single time, the diffusion model now actually analyzes facial landmarks and pixel geometry straight from a source image. If you know how to dial in the weight parameters, you can lock down skin texture, eye shape, and even exact clothing styles across hundreds of generations.
In this 2026 guide, I’m breaking down the exact workflows I use to build and maintain a rock-solid character. We’re moving past basic text prompts and digging into the Midjourney Web UI features, parameter weights, and seed locking tricks that actual power users rely on every day.
Table of Contents
- Mastering the Character Reference (–cref) Engine
- Ditching Discord: The Web UI Workflow
- Saving Your Sanity with Custom Character Variables
- Building the Bulletproof Base Character Sheet
- Dialing in Identity with Character Weight (–cw)
- Locking It Down with the Seed Parameter (–seed)
- Colliding Worlds: Merging Character and Style References
- Fixing Warped Faces and Averaging Identities
- Frequently Asked Questions
Mastering the Character Reference (–cref) Engine
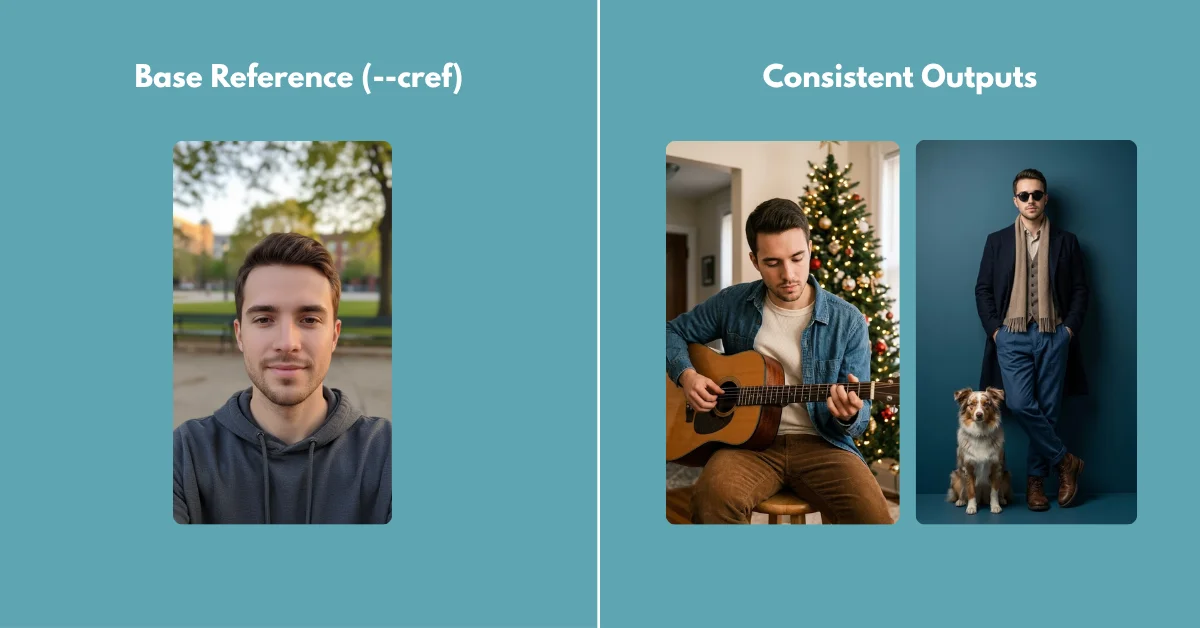
The –cref parameter is the absolute bedrock of modern character consistency. Before this came along, you had to type “30-year-old woman with green eyes, a scar on her left cheek, and curly red hair” into every single prompt and just cross your fingers that the engine interpreted it the same way twice.
Now? You just feed Midjourney a picture of her.
To pull this off in Discord, you append --cref followed by the URL of your base image right at the end of your prompt. The algorithm reads that image, maps the underlying facial structure, and forcefully applies it to your new text instructions.
/imagine prompt: A woman drinking coffee in a busy Tokyo cafe --cref https://link-to-your-image.jpg --v 6.1If you find yourself constantly typing out these complex parameter strings—and I do—running your core ideas through a dedicated Free Midjourney Prompt Generator can help format the syntax perfectly before you paste it into the bot.
Key Takeaway: Here’s the catch: Do not use real photographs of living people unless you actually own the rights. I’ve found the character reference system works best when the reference image was natively generated within Midjourney itself.
Ditching Discord: The Web UI Workflow
While legacy tutorials focus entirely on juggling Discord URLs, most artists I know in 2026 have completely transitioned to the Midjourney Web Editor. The web interface eliminates the need to copy and paste messy image links entirely.
The workflow here is highly visual and dramatically faster.
- Open the Midjourney Alpha website and navigate to the imagine bar at the top.
- Click the (+) icon to upload your base character image, or simply drag and drop an image directly from your past generations into the prompt box.
- Once the image appears in the prompt bar, hover over it. You will see three icons: a picture frame (Image Prompt), a paintbrush (Style Reference), and a small person icon (Character Reference).
- Click the person icon. A small pin will appear, indicating that this image is now locked in as your
--cref.
You can now type your new text prompt normally. The Web UI handles all the parameter syntax in the background for you. If you want to dive deeper into the technical mechanics, the official Midjourney parameter documentation provides excellent patch notes on exactly how the Web UI interprets these visual flags.
Saving Your Sanity with Custom Character Variables
If you’re the kind of person who prefers to stay in the Discord trenches, you already know dealing with long image URLs is incredibly annoying. A single URL can gobble up half your prompt window. Power users bypass this headache entirely by setting up custom variables.
You can use the /prefer option set command to save a sprawling URL into a short, custom tag. Think of it as a keyboard shortcut built specifically for your character.
Type /prefer option set into Discord. For the “option” name, type something recognizable, like myhero. For the “value”, paste the full image URL.
/imagine prompt: A sci-fi soldier standing in the rain --cref --myheroNow, whenever you type --myhero, Midjourney instantly injects the full URL. This keeps your prompts clean, easy to read, and prevents you from accidentally pasting the wrong link during late-night generation sessions.
Building the Bulletproof Base Character Sheet
I’ve learned the hard way that a single headshot is rarely enough for perfect consistency. If you only provide a front-facing portrait, the algorithm has to wildly guess what your character’s profile looks like the second you ask for a side angle.
The fix is generating a comprehensive character sheet with totally neutral lighting first. Harsh cinematic lighting creates heavy shadows, which the AI notoriously mistakes for actual physical facial features—like artificially deep cheekbones or uneven skin.
Here is the exact foundational formula I use to create my base:
/imagine prompt: Multiple views of the same character, character design sheet, turnaround, front view, side profile view, back view, [Subject Description], wearing simple clothing, flat studio lighting, neutral grey background --ar 16:9 --style rawOnce you generate a sheet you love, upscale it. Use this entire grid as your --cref link. Because the image contains the face from multiple angles, the AI now has complete 3D context. When you ask it to generate the character looking over their shoulder, it pulls exact data from the back and profile views rather than making things up.
Key Takeaway: Always generate your base character against a plain background. Complex backgrounds in a reference image can bleed into your new generations, causing unwanted visual artifacts that are a nightmare to edit out later.
Dialing in Identity with Character Weight (–cw)
Applying a character reference is only half the battle. You have to explicitly tell the algorithm exactly what parts of that character it needs to keep. Do you want them wearing the exact same outfit, or do you just want their face?
That’s where the Character Weight parameter (–cw) comes in. It runs on a scale from 0 to 100.
- –cw 100 (Default): Copies the face, hair, and clothing. I use this if my character wears a specific uniform or signature outfit that must remain identical across scenes.
- –cw 50: Retains the face and hair perfectly, but begins to allow the text prompt to alter the clothing based on the new environment.
- –cw 0: Locks strictly onto the face. The clothing, body type, and hair can be completely rewritten by your text prompt.
If you want your cyberpunk hacker to suddenly wear a Victorian ballgown, leaving the weight at 100 will cause the engine to struggle. It will try to blend a leather trench coat with a corseted gown, resulting in an ugly hybrid. You must drop the weight.
/imagine prompt: A woman wearing an elegant 1800s Victorian ballgown --cref URL --cw 0When generating period-accurate clothing, reading up on Midjourney Prompts for Cinematic Realism will show you how to structure the fabric textures and lighting descriptions to match the new setting flawlessly.
Locking It Down with the Seed Parameter (–seed)
Even when I have my Character Weight perfectly dialed in, I sometimes notice tiny micro-variations. An eyebrow sits slightly higher. A jawline softens by a millimeter. This happens because Midjourney starts every single generation with a totally random grid of static noise.
To eliminate that final 5% of variance, you have to lock the starting noise grid using the seed parameter.
Every image generated by Midjourney has a unique seed number. You can find this number in Discord by reacting to your image with the envelope emoji (✉️), or by looking at the image details in the Web UI. Once you have that number, append it to your prompt.
/imagine prompt: A man sitting in a diner --cref URL --cw 100 --seed 14859302By combining --cref with a locked --seed, you are forcing the algorithm to use the exact same starting static and the exact same visual reference. This is the secret to producing comic book panels where the character looks completely identical from frame to frame without feeling uncanny.
Colliding Worlds: Merging Character and Style References
So what happens when you need your photorealistic character to suddenly appear as a 1990s anime cel, or a washed-out watercolor painting? You stack your references.
Midjourney lets you use a Character Reference (--cref) and a Style Reference (--sref) in the exact same prompt. The engine separates the two tasks intelligently. It pulls the identity from the cref link and strips the aesthetic texture from the sref link.
/imagine prompt: A man sitting on a train reading a newspaper --cref [Face_URL] --cw 0 --sref [Anime_Style_URL] --sw 250If the final output feels muddled, your text prompt likely contains aesthetic keywords that are actively fighting the style reference. Keep the text strictly literal. Describe the action and the setting, then let the image references do the heavy lifting.
If you are exploring other models to see how they handle this dual-reference challenge, our breakdown on FLUX vs. Midjourney highlights distinct differences in how each engine prioritizes character versus style constraints.
Fixing Warped Faces and Averaging Identities
Sometimes, extreme camera angles or highly dynamic actions will just warp your character’s facial features. If you ask for a character looking straight down from a rooftop, the perspective shift might cause their eyes to lose symmetry.
First things first: ensure your text prompt isn’t actively fighting your reference image. If your --cref image shows a man with a heavy beard, and your text prompt says “clean shaven,” the algorithm will panic and produce a bizarre, patchy compromise.
Second, you can use the multi-reference technique to average out inconsistencies or create entirely new, un-copyrighted characters from scratch. You can actually feed multiple URLs into the --cref parameter just by separating them with a space.
/imagine prompt: A portrait of a warrior --cref[URL_1] [URL_2] --cw 100Blending a wide shot of your character with an extreme close-up of their face forces the engine to prioritize the macro details. This technique is heavily used by creators building AI influencers, as blending two generated faces creates a 100% unique identity. For a deep dive into advanced blending math, read our guide on How to Merge Two Images into One AI Prompt.
Finally, if the output is 90% perfect but features a slight anatomical flaw—such as a warped pupil or strange teeth—do not re-roll the entire prompt. Use the Vary (Region) tool. Select the specific area that failed, leave the original prompt intact, and let Midjourney regenerate only those local pixels. Similar to the logic used for fixing bad hands in Stable Diffusion, localized inpainting is always safer than re-rolling the entire canvas.
Getting character consistency right in Midjourney is no longer a matter of luck; it’s a matter of leverage. The models are powerful enough to give you exactly what you want, provided you stop asking them nicely and start giving them the strict visual boundaries they need. While there’s a learning curve to managing URLs and weights, the payoff of finally having a character that actually looks like themselves across a hundred different scenes is well worth the effort.
Frequently Asked Questions
Why does my character look different when I change the lighting in my prompt?
Lighting drastically alters how the algorithm perceives facial geometry. If your base reference image has flat studio lighting, and your new prompt asks for harsh, directional cinematic shadows, the AI has to invent the shadow placement. This often alters the perceived shape of the nose and cheekbones. I always try to use reference images with neutral lighting to avoid this entirely.
Can I use –cref to combine two different people?
Yes. If you input two different image URLs after the –cref parameter, Midjourney attempts to average their facial features. I’ve found this is an excellent way to create a completely unique, un-copyrighted protagonist by blending two distinct, computer-generated faces.
Does the aspect ratio of my reference image matter?
The aspect ratio of the reference image itself does not break the generation, but matching the aspect ratio of your target output to your reference image significantly reduces crop-related distortions. If your reference is a tall portrait (–ar 9:16), asking for an ultra-wide cinematic shot (–ar 21:9) forces the engine to hallucinate a massive amount of unreferenced background data.
Why is –cw 100 ignoring my clothing prompts?
That is exactly what it is designed to do. A character weight of 100 tells the algorithm that the clothing in the reference image is strictly mandatory. If you want to change their outfit using a text prompt, you must lower the character weight to –cw 0 or –cw 10.
How do I create a consistent character turnaround sheet?
To generate a turnaround sheet, I use a prompt that explicitly asks for multiple angles, such as “character design sheet, turnaround, front view, side profile view, back view.” Keep the background description simple (like “plain white background”) so the engine focuses entirely on character symmetry rather than drawing complex environments.

)