I have experienced the sheer frustration of blind AI blending more times than I can count. If you’re the kind of person who uploads a picture of your pet and a picture of an astronaut suit into your generative tool of choice, you probably expect a photorealistic, cinematic masterpiece of a space-faring animal. Instead, the model spits out a chaotic, three-legged creature floating in a distorted nebula of pixels.
The problem isn’t that the artificial intelligence lacks the ability to draw. The real issue lies in the model’s complete inability to intuitively understand your intended relationship between the two visual inputs. When you simply smash two images together without a semantic text bridge, the AI is forced to guess your intentions—and it usually guesses wrong.
Which brings us to the actual solution. To achieve professional, agency-quality results, you simply cannot rely on basic blending tools. I noticed early on that you need to provide a semantic bridge—a highly specific text prompt that explicitly tells the model how to fuse the DNA of two distinct visuals. So, I decided to break down the exact frameworks and copy-paste prompts required to merge images flawlessly across ChatGPT, DALL-E 3, and Midjourney.
Table of Contents
The Frankenstein problem of blind blending
Most casual users rely entirely on what I call the digital slot machine method. They upload two source photos, hit the generate button, and pray the algorithm magically figures out what they want. This workflow might be perfectly fine for casual hobbyists. That said, it is an absolute nightmare for professional graphic designers or digital marketers who require strict consistency.
When I tested basic commands like Midjourney’s `/blend`, I saw exactly how the model thinks: it simply looks at the pixel data of both images and attempts to find a mathematical middle ground. It doesn’t understand hierarchy. If you upload a photo of a Victorian woman and a photo of a Cyberpunk cityscape, the AI completely lacks the context to know which image is the subject and which is the background.
Without text guidance, the AI might place the woman inside the city, or it might disastrously attempt to turn the city buildings into a dress. By generating a structured text prompt first, you establish strict rules of engagement for the neural network. You are explicitly dictating the boundaries of the image generation process, leaving nothing to chance.
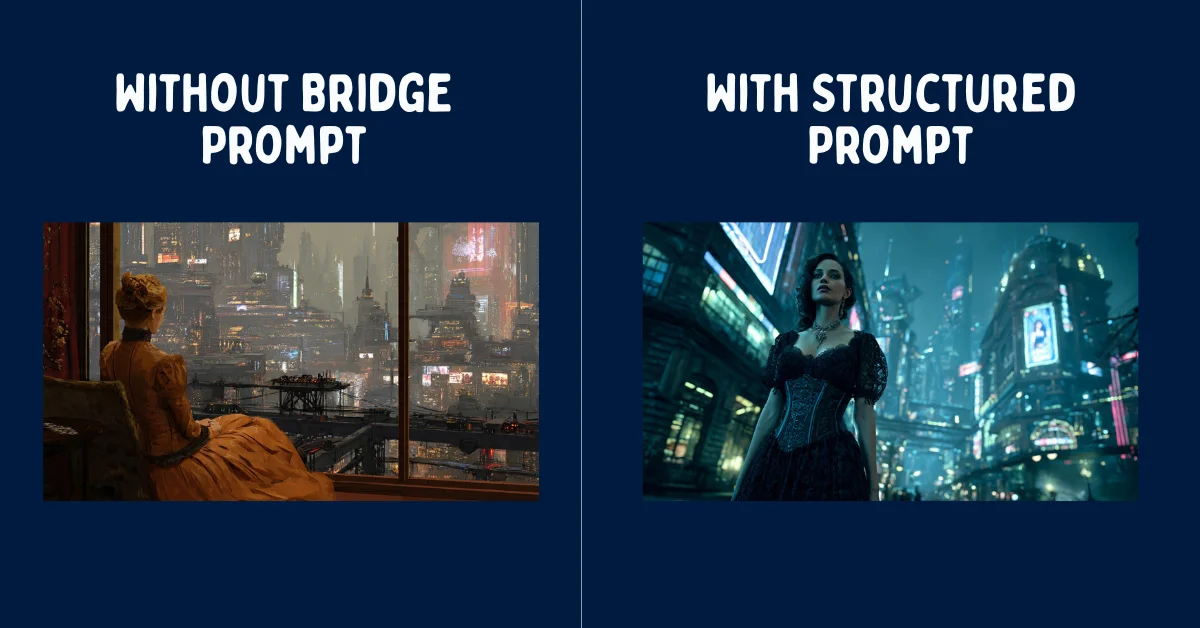
I found that you absolutely must tell the model exactly what to extract from each image. For example, your prompt should clarify: “Subject: Victorian Lady. Context: Cyberpunk City. Lighting: Neon Blue. Style: Photorealistic.” This explicit instruction completely eliminates the Frankenstein effect, ensuring the final output is cohesive, logically sound, and actually useful.
Building a better image fusion framework
Before you type a single word into your prompt bar, you have to define the exact purpose of the image fusion. Successful AI image merges don’t happen by accident. I learned the hard way that they require you to categorize your source files into specific, rigid roles.
1. The subject vs. style strategy
Every successful image merge I’ve tested typically falls into one of three distinct architectural categories. Identifying which category your project belongs to is the crucial first step in writing an effective prompt.
- The Texture Swap (Subject + Art Style): Let’s say you have a standard photograph of a car, and you also have an abstract, heavy oil painting. Your goal is to keep the exact silhouette and make of the car, but paint it using the thick brushstrokes of the second image. Your prompt must physically describe the car but exclusively use medium-specific keywords (e.g., “impasto,” “thick brushwork,” “palette knife”) from the painting.
- The Lighting Heist (Subject + Atmosphere): You possess a great portrait photo, but the studio lighting is incredibly flat and boring. You also have a moody, highly contrasted film still from a sci-fi movie. That’s where things get interesting. Your prompt must ignore the actors in the film still entirely, focusing only on tokens like “volumetric fog,” “neon rim lighting,” and “harsh cinematic shadows.”
- The Chimera (Concept + Concept): This is the most complex merge I tested. You want to combine a cat and a military tank. Unsurprisingly, your prompt cannot simply say “a cat tank.” It must explicitly describe the physiological fusion, such as “A feline battle tank, heavy metal treads resembling giant paws, primary turret shaped like a mechanical cat head.”
2. Generating the bridge prompt manually
Instead of struggling to find the perfect adjectives to describe your images, you can easily use a Large Language Model (LLM) to act as your semantic translator. I noticed that by feeding two images into a vision-capable AI, you can just ask it to generate the perfect bridge prompt for you.
If you’re using ChatGPT Plus or Claude 3.5, upload both of your reference images directly into the chat window. Then, paste the following meta-prompt to force the AI to analyze the visual data and construct a highly optimized generation string.
Act as an Expert AI Prompt Engineer. I have uploaded two images. Image A is my core subject. Image B is my style and lighting reference.
Please analyze the anatomical structure, pose, and core identity of Image A. Then, analyze the color grading, artistic medium, and environmental lighting of Image B.
Generate a highly descriptive, comma-separated text prompt designed for an image generator. The prompt must describe the subject of Image A perfectly, but render it entirely utilizing the aesthetic, lighting, and texture of Image B. Do not mention the existence of the uploaded images in the final prompt output.
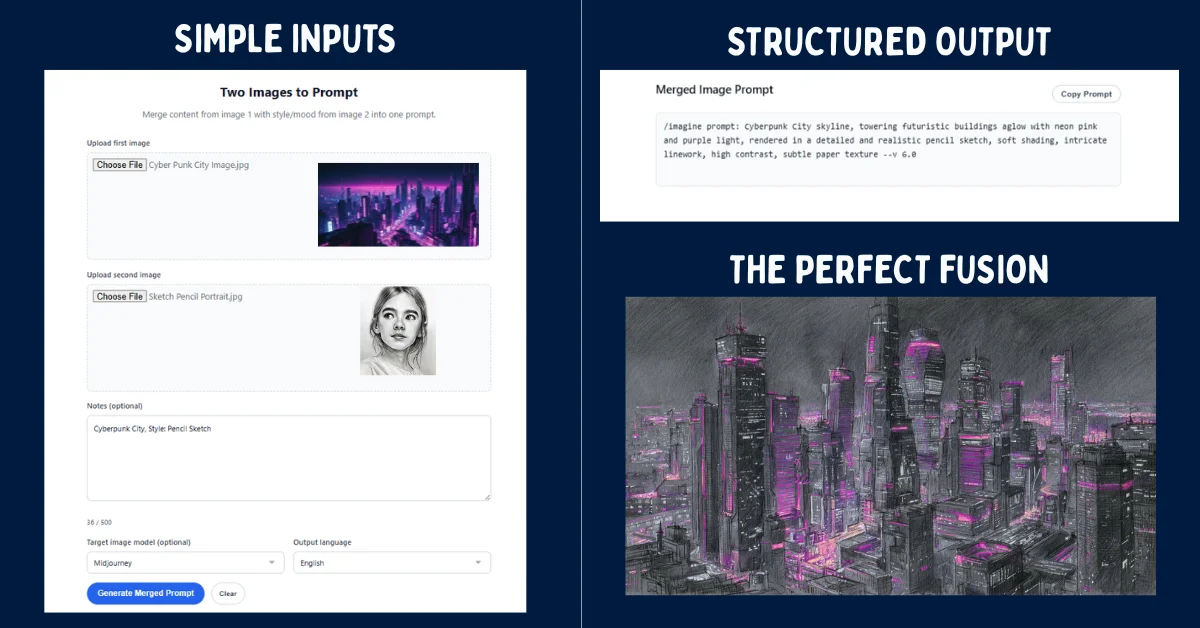
This automated analysis extracts dense, token-rich vocabulary that humans often miss. For users who want to streamline this entire process without the tedious manual back-and-forth prompting, you can upload your assets directly into a dedicated Merge two images into one AI prompt tool, which handles the semantic bridging automatically.
3. The golden ratio formula
Once you have your base vocabulary, you have to structure it using what I call the Golden Ratio Formula. Generative AI models consistently prioritize words at the very beginning of a prompt. Here’s the catch: if you put your style keywords before your subject keywords, the subject will inevitably warp and deform.
In my tests, the structural hierarchy must always follow this exact sequence:
[Subject of Image A] +[Action/Pose of Image A] + [Art Style/Medium of Image B] + [Lighting/Color Palette of Image B] + [Technical Parameters]For example, if you are merging a gritty detective photo with a neon cyberpunk street sign, your prompt should look like this: “A weary detective in a trench coat, slumped posture smoking a cigarette, cyberpunk aesthetic, vibrant neon pink and blue color palette, wet pavement reflections, hard rim lighting, shot on 35mm anamorphic lens, –ar 16:9.”
Notice how I deliberately stripped the original black-and-white color grading from the detective’s description. I replaced it entirely with the neon tokens from the second image. This level of precise token control is exactly what separates amateur generations from professional artwork.
5 copy-paste prompts to merge images in ChatGPT
If you’re generating images directly inside ChatGPT using DALL-E 3, the workflow is slightly different. DALL-E 3 cannot manipulate raw pixels directly like Stable Diffusion can. Instead, it relies entirely on its language model to interpret your uploaded images.
To merge photos effectively in ChatGPT, I found that you must use highly conversational, strict instructional prompts. Upload your two images into the chat, and paste one of the following templates depending on your specific goal.
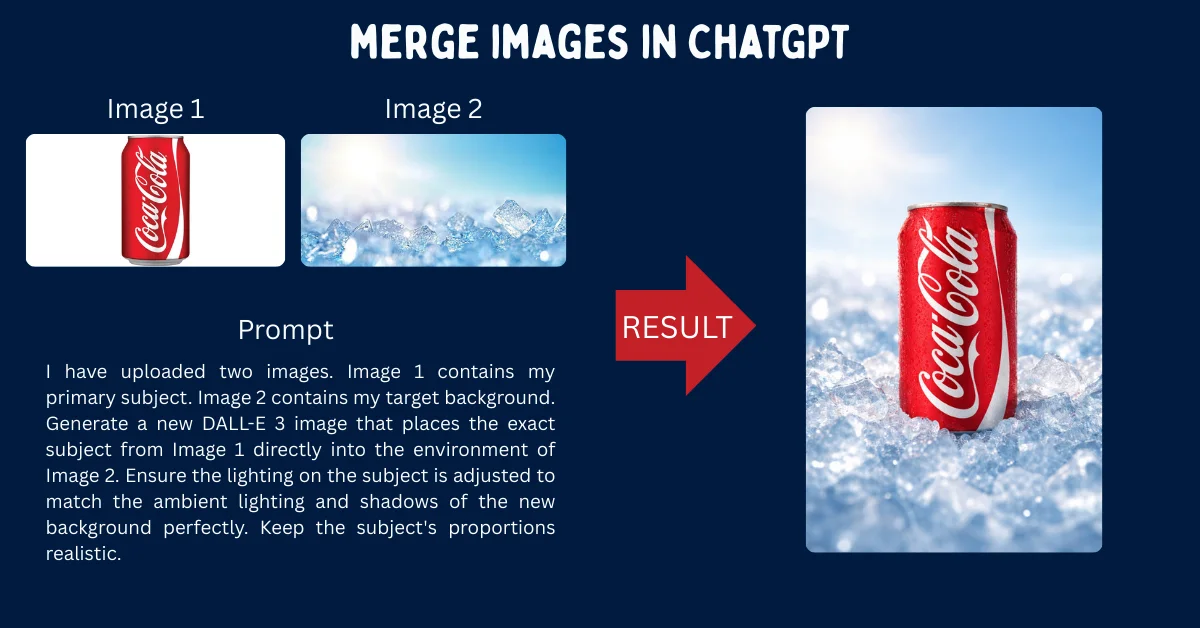
1. The seamless background swap
Use this prompt when you have a perfect product photo or character portrait, but you desperately need to place them into the environment shown in the second image.
I have uploaded two images. Image 1 contains my primary subject. Image 2 contains my target background. Generate a new DALL-E 3 image that places the exact subject from Image 1 directly into the environment of Image 2. Ensure the lighting on the subject is adjusted to match the ambient lighting and shadows of the new background perfectly. Keep the subject's proportions realistic.2. The artistic style transfer
This template forces DALL-E 3 to act like a digital painter, completely rewriting the medium of your photograph. I tested this with several landscapes, and the results were surprisingly cohesive.
Analyze the uploaded images. Image 1 is a photograph. Image 2 is a specific art style (e.g., watercolor, oil painting, 3D render). Generate a new image depicting the exact contents, people, and layout of Image 1, but illustrated 100% in the specific artistic medium, brushstroke style, and color palette of Image 2. Do not alter the underlying composition.3. The character morph (face blending)
If you’re trying to combine the facial features of two different characters or people, you absolutely must guide the AI to map the anatomy correctly, otherwise you get a mutant.
Look at the two portraits I have uploaded. Generate a new, highly detailed portrait of a completely new character who looks like the genetic offspring of the person in Image 1 and the person in Image 2. Blend their jawlines, eye shapes, and hair textures equally. Use dramatic studio lighting and a plain dark background to highlight the facial features.4. The cinematic lighting adoption
This is perfect for filmmakers and photographers who want to test lighting setups without changing their subject. I use this constantly to storyboard.
Image 1 is my main subject. Image 2 is my lighting reference. Generate a new image of the subject from Image 1, but apply the exact cinematic lighting setup found in Image 2. Replicate the direction of the light source, the shadow depth, the color temperature, and any lens flares or volumetric fog present in the lighting reference.5. The concept hybrid (chimera)
This is for when you want to seamlessly mash two entirely unrelated objects together into a surreal piece of art. It’s the ultimate test of the model’s reasoning loops.
Analyze the primary object in Image 1 and the primary object in Image 2. Design a seamless, surreal hybrid object that perfectly combines the physical characteristics, textures, and functions of both items. The fusion must look physically plausible and highly detailed, rendered in a hyper-realistic 8k photographic style on a neutral studio backdrop.Beyond /blend: Using Midjourney references (–sref & –cref)
For years, Midjourney users relied on the `/blend` command or raw image weights (`–iw`) to merge visuals. While these methods still technically function, I noticed they have been entirely superseded by the advanced referencing parameters introduced in Midjourney v6.
If you’re still using `/blend`, you are sacrificing massive amounts of creative control. Modern professional workflows utilize Style References (`–sref`) and Character References (`–cref`) to achieve flawless fusions. To automate the creation of these complex parameter strings, many artists (myself included) rely on a Free Midjourney Prompt Generator to ensure syntax accuracy.
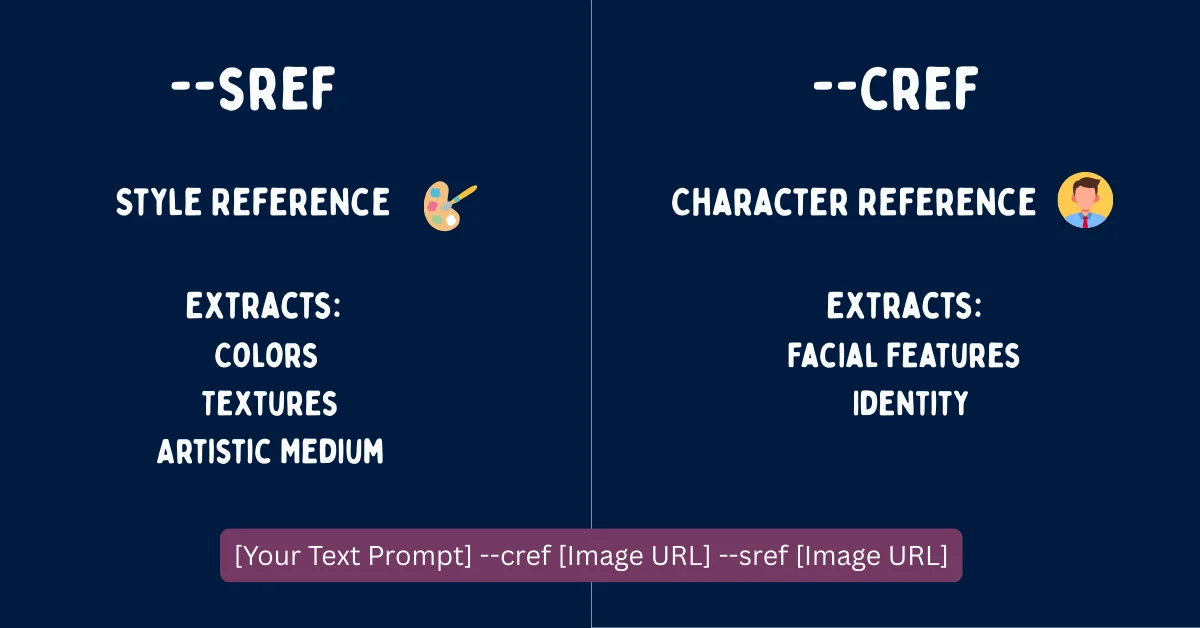
Mastering style references (–sref)
The `–sref` parameter explicitly tells Midjourney to look at an image URL and extract only its aesthetic vibe, completely ignoring the subject matter. In my testing, this proved to be the ultimate tool for the “Texture Swap” or “Lighting Heist.”
To use it, you just write a normal text prompt describing your subject, then append the parameter and the URL of your style image. You can also control how strongly the style is applied using the Style Weight (`–sw`) parameter, which ranges from 0 to 1000.
A sleek futuristic sports car driving through a rainy city --sref https://link-to-oil-painting.jpg --sw 800 --v 6.0In the example above, Midjourney will draw a car, but it will cleverly render it with the heavy brushstrokes and color palette of the provided oil painting URL. The high style weight of 800 ensures the painting aesthetic heavily dominates the final render.
Perfecting character references (–cref)
The `–cref` parameter is basically the holy grail for maintaining facial consistency. It tells Midjourney to lock onto the facial features, hair, and clothing of a specific character image, effortlessly allowing you to merge that character into entirely new environments or art styles.
You can adjust the Character Weight (`–cw`) anywhere from 0 to 100. At `–cw 100`, the AI fiercely tries to copy the face, hair, and clothing. If you drop it to `–cw 0`, the AI only copies the face, allowing you to freely change the character’s outfit in the text prompt.
A cinematic shot of a warrior standing in a neon cyberpunk alleyway, wearing high-tech armor --cref https://link-to-character-face.jpg --cw 0 --v 6.0By combining both parameters in a single prompt, you can achieve the ultimate image merge. I tested this by taking a photo of myself (`–cref`), placing myself in a new scenario via text, and rendering the entire scene in the style of a famous comic book artist (`–sref`). The result was surprisingly sharp, and it completely eliminates the chaotic guesswork of the old blending algorithms.
The final verdict
At the end of the day, forcing AI to merge images seamlessly is still a game of precision. The tools attached to models like DALL-E 3 and Midjourney are undeniably powerful, but they still require you to be the director. To be fair, manual prompt bridging and parameter tweaking take more effort than just hitting a blend button. You will still occasionally get a warped limb or a misunderstood texture. Still, with the right structural frameworks in place, you can engineer exactly what you need. As these models get faster and more logical in upcoming iterations, the gap between what you envision and what you generate is only going to close further.
Frequently Asked Questions (FAQ)
How do I combine two pictures without using Photoshop?
You can easily combine two pictures using generative AI tools like ChatGPT (DALL-E 3) or Midjourney. Instead of manually masking and layering in Photoshop, you upload the images to the AI and use a structured text prompt to firmly instruct the model on how to merge the subject of one image with the style or background of the other.
Can I merge more than two images in Midjourney?
Yes, Midjourney allows you to use multiple image prompts simultaneously. I’ve found you can include several URLs in your prompt, or use multiple Style References by stringing them together (e.g., `–sref URL1 URL2`). The AI will naturally average the influence of all provided reference images to create the final output.
Why does ChatGPT refuse to merge my images?
ChatGPT has strict safety filters regarding real people. If you upload photos of real individuals, especially public figures, DALL-E 3 may outright refuse to manipulate or merge their faces to prevent deepfakes. To bypass general errors with non-human subjects, I recommend ensuring your prompt acts as a descriptive bridge rather than asking for direct pixel manipulation.
What is the difference between an image prompt and a style reference in Midjourney?
A standard image prompt (pasting a URL at the front of your text) directly influences both the subject matter and the composition of the final image. A Style Reference (`–sref`), on the other hand, specifically isolates and extracts only the artistic medium, color palette, and texture, leaving the subject matter entirely up to your text prompt.
How do I keep my character’s face the same when merging backgrounds?
To maintain absolute facial consistency while changing environments, you should use Midjourney’s Character Reference parameter. Just append `–cref [URL]` to your prompt and set the character weight to `–cw 0`. This strictly locks the face of your original image while gracefully allowing the text prompt to dictate the new background and clothing.

)