I’ve been there a hundred times. You execute the perfect prompt, and at first glance, the composition is flawless. The cinematic lighting hits exactly where you envisioned, and the aesthetic matches your reference perfectly. Then, you zoom in on the subject’s face. The eyes are pointing in two completely different directions. The teeth look like a shattered piano keyboard, and the skin has the texture of melted wax. Just like that, the entire image is ruined.
Here’s the catch: this happens because generative AI models like Midjourney and Stable Diffusion do not possess an inherent understanding of human biology. They are diffusion models. In practice, that means they are trained to reverse digital noise into recognizable pixel patterns based on statistical probabilities. While I’ve noticed the algorithm is exceptionally good at rendering the chaotic textures of a forest or a brick wall, it falls apart on faces because human biology demands absolute mathematical symmetry.
Our brains are evolutionarily hardwired to detect even a millimeter of facial asymmetry. To stop generating these digital nightmares and start creating photorealistic portraits, you have to constrain the AI. I’ve found that you must override its default rendering habits using highly specific biological terminology, targeted negative prompts, and localized inpainting techniques. I put these methods to the test, and this guide provides the exact workflows required to fix weird AI faces permanently.
Table of Contents
- Reason 1: The “Pixel Budget” Problem
- Step-by-Step: Using Midjourney’s Vary (Region) to Fix Faces
- Reason 2: You Aren’t Using Negative Prompts
- Reason 3: Your Positive Prompts Lack Biological Specificity
- The Portrait Prompting Formula
- Reason 4: The “Generic” Trap (Model Bias)
- Reason 5: Technical Parameters (Midjourney Specifics)
- Top Free AI Face Restoration Tools
- Frequently Asked Questions (FAQ)
Reason 1: The “Pixel Budget” Problem
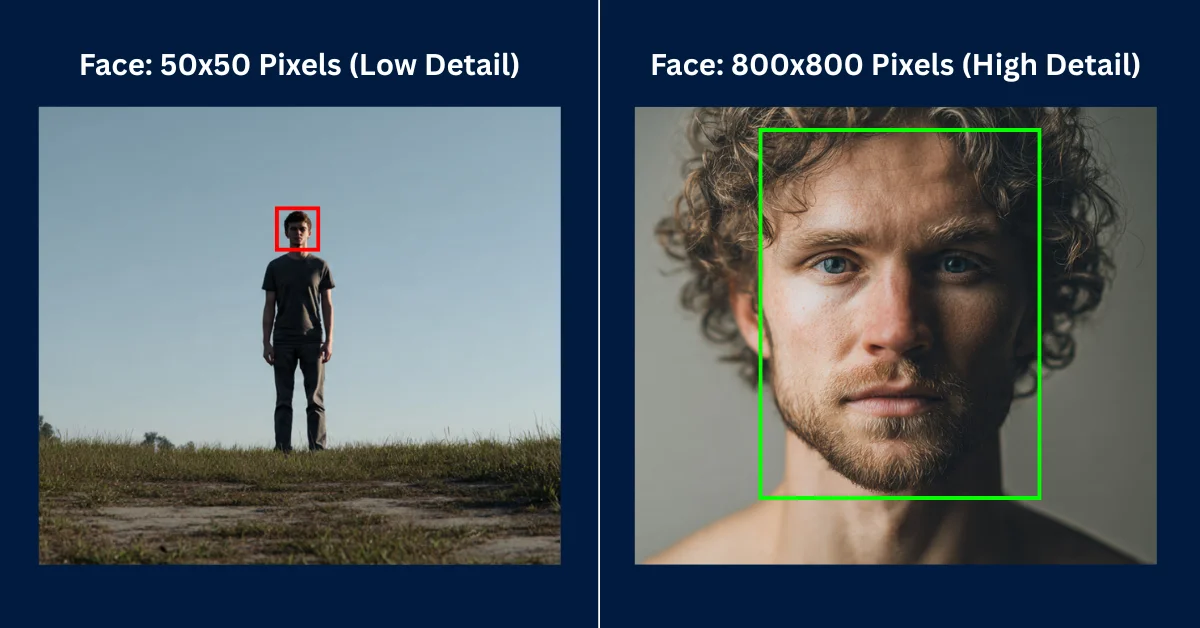
The most common reason for distorted faces is an issue almost nobody discusses: the “pixel budget.” Generative AI models operate within strict resolution constraints. If you generate a standard image at 1024×1024 pixels featuring a full-body shot of a character standing in a grand cathedral, the character’s face might only occupy 5% of the total canvas.
Mathematically, that means the face is rendered using a tiny grid of maybe 50×50 pixels. The AI simply does not have enough physical pixels available to accurately draw complex micro-details like pupils, individual eyelashes, nostrils, and dental structures. Because it lacks the resolution to render these details correctly, it improvises by clustering random dark and light pixels together. Unsurprisingly, that improvisation results in a blurry, mashed appearance.
If you are working locally with Stable Diffusion, the permanent fix I rely on is enabling Hires Fix. This feature renders the initial image at a lower resolution to establish the composition, and then aggressively upscales it while injecting new detail into the smaller areas. It effectively forces the AI to dedicate more processing power to the facial region during the second pass.
For Midjourney users, you must adjust your camera framing. Stop asking for full-body environmental shots if the character’s face is your primary focus. I always force the model to dedicate 80% of its pixel budget to the face by using explicit framing keywords like Extreme Close-Up, Macro Portrait, or 50mm Bust Shot.
Step-by-Step: Using Midjourney’s Vary (Region) to Fix Faces
That said, if you absolutely need a wide, full-body shot but refuse to accept a distorted face, your best option is localized inpainting. Inpainting allows you to freeze the entire image and ask the AI to completely redraw a specific masked area. Midjourney handles this natively through its Vary (Region) tool, and I use it constantly.
Rather than continually re-rolling the entire prompt and losing your perfect background, I recommend following this precise workflow to repair the facial anatomy.
- Upscale your chosen image: Click the U1, U2, U3, or U4 button beneath your generated grid to isolate and upscale the image containing the bad face.
- Launch the Editor: Click the
Vary (Region)button located under the upscaled image. This opens the internal editing interface. - Mask the Face: I always use the Lasso Tool (not the square marquee) to draw a tight, accurate circle strictly around the character’s distorted face. Do not include too much background or hair, as the AI will attempt to fill that extra space.
- Modify the Prompt: In the text box below the editor, delete your original long prompt. Replace it with a hyper-specific description of the face only. Type exactly this: “A highly detailed face, symmetrical eyes, perfect anatomical proportions, sharp focus, 8k resolution.”
- Submit: Click the arrow to run the job. Midjourney will generate four new variations, stitching a high-resolution, perfectly rendered face onto your original body.
Reason 2: You Aren’t Using Negative Prompts
While Midjourney handles a lot of aesthetic correction under the hood, open-source models like Stable Diffusion require you to manually police the neural network. If you do not explicitly tell the AI what it is forbidden from doing, it will assume all visual anomalies are perfectly acceptable.
To consistently generate photorealistic human faces, I found you must build a “Universal Negative” string. This is a block of text you append to the negative prompt field to safeguard human anatomy against the model’s worst tendencies. If you’re the kind of person who struggles to format these strings manually, using a dedicated Stable Diffusion Prompt Generator will automatically inject optimal negative constraints into your workflow.
Whenever I test these models, I just copy and paste this exact anti-distortion list into the negative prompt settings:
asymmetry, mutated, deformed, disfigured, extra limbs, poorly drawn eyes, missing facial features, blurry, crossed eyes, malformed jaw, out of focus, long neck, bad anatomy, bad proportions, gross proportions, cloned face, plastic skin, waxy skin, tiling, poorly drawn face, text, watermarkReason 3: Your Positive Prompts Lack Biological Specificity
Here’s an oversight I see constantly: writing generic adjectives like “beautiful woman” or “handsome man.” It’s a critical prompting error. Generative models have vast, uncurated training datasets. Their definition of “beautiful” includes millions of low-resolution selfies, amateur digital paintings, and heavily filtered social media posts.
To force enterprise-grade realism, you must describe the biological traits of a healthy human face. You are essentially commanding the AI to prioritize dermatological and anatomical accuracy over vague aesthetic concepts.
- Symmetrical eyes: Including this exact phrase drastically reduces the chances of the “lazy eye” effect where pupils look in different directions.
- Detailed iris and specular highlights: This forces the AI to render the complexity of the eye structure and the reflection of light bouncing off the cornea, rather than drawing flat black dots.
- Skin pores and microscopic skin texture: This prevents the model from applying its default smoothing algorithm, which I’ve noticed often results in subjects looking like wax figures or plastic mannequins.
- Volumetric lighting / Rembrandt lighting: This helps define the three-dimensional shape of the nose bridge and cheekbones, preventing the face from looking flat against the background.
The Portrait Prompting Formula
To consistently bypass the uncanny valley, you need a strict structural framework. AI models prioritize the concepts placed at the very beginning of the prompt sequence. If you describe the background first, the AI spends its computational weight there, leaving the face as an afterthought.
When I draft my prompts, this is the exact structural sequence I follow:
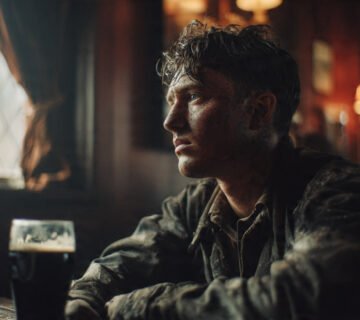
[Subject Definition + Facial Specifics] + [Camera Framing/Lens] + [Lighting Conditions] +[Styling/Film Stock] + [Technical Constraints]Example 1: The Cinematic Grit Portrait
A rugged firefighter with soot-covered skin, piercing blue symmetrical eyes, detailed stubble texture, extreme close-up macro portrait, focus on eyes, harsh orange firelight from the right side, deep shadows, cinematic realism, sweat droplets, shot on 100mm macro lens, f/2.8, highly detailed, 8k resolution –style raw
Example 2: The Ethereal Fantasy Portrait
An elven queen with porcelain skin revealing faint microscopic pores, glowing runic tattoos on cheeks, violet symmetrical eyes with star-shaped pupils, medium bust shot, looking directly at the camera, soft moonlight filtering through trees, bioluminescent ambient glow, fantasy art, sharp focus, masterpiece –ar 2:3
Reason 4: The “Generic” Trap (Model Bias)
That brings us to another subtle issue. If you fail to specify a distinct ethnicity or age, the neural network defaults to a statistical average. It blends thousands of faces together to create a baseline output. This averaging effect is what produces the recognizable “AI stare”—a plastic, soulless, hyper-symmetrical face that looks vaguely familiar but fundamentally artificial.
To break the algorithm’s bias, you must ground your subject in reality by introducing deliberate imperfections. Perfection triggers the uncanny valley; imperfection creates realism.
- Specify distinct nationalities: Instead of “a man,” I typically type “a 45-year-old Norwegian fisherman” or “a young Ethiopian scholar.”
- Demand texture: I always include descriptors like “sun-weathered skin,” “light freckles across the nose bridge,” or “faint laugh lines.”
- Introduce minor flaws: Adding “a small scar on the left cheek” or “slightly messy eyebrows” forces the AI to abandon its symmetrical beautification routine and render a unique human being.
Reason 5: Technical Parameters (Midjourney Specifics)
If you are using Midjourney, text prompts alone are only half the battle. The model uses a complex suffix parameter system that heavily dictates how it processes anatomical structures. If you want to automate this process, relying on a Midjourney Prompt Generator will ensure your syntax is flawless, but you must still understand the underlying mechanics yourself.
–style raw
This is arguably the most critical parameter for portraiture. Midjourney has a heavy default aesthetic bias; it wants to make everything look like a dramatic digital painting or a heavily retouched editorial photo. By appending --style raw to the end of your prompt, you reduce this beautification filter. I’ve found it allows the raw textures, pores, and natural lighting of your text prompt to take precedence over the AI’s internal styling.
Character Reference (–cref) and Character Weight (–cw)
Introduced in v6, the Character Reference parameter is the ultimate tool for generating consistent, flawless faces. Instead of relying purely on text to describe an anatomy, you can feed Midjourney a URL of a real, perfectly proportioned human face to use as a blueprint.
Append --cref https://www.wordplays.com/crossword-solver/of-the-face-%286%29 to your prompt. The AI will map the exact facial structure of the reference image onto your new generation, bypassing its tendency to hallucinate weird geometry. You can control how strictly it follows the reference using the Character Weight parameter.
When I set it to --cw 100, it copies the face, hair, and clothing. If you only want the facial structure to remain intact while changing the outfit, lower the parameter to --cw 0. This guarantees perfect anatomical consistency across multiple generations.
Top Free AI Face Restoration Tools
Sometimes, despite your best prompting efforts, the overall composition is a masterpiece but the subject in the background still has a distorted face. Do not discard the image. Instead, I push it through an external post-processing restoration tool. These tools use specialized neural networks trained exclusively on facial reconstruction.
GFPGAN (Generative Facial Prior GAN)
Developed by Tencent ARC, GFPGAN is the industry standard open-source tool for rescuing melted AI faces. It scans your image, detects where faces are supposed to be, and uses a generative adversarial network to reconstruct the eyes, nose, and mouth based on anatomical priors. In my testing, it works exceptionally well on blurry or highly artifacted faces located in the background of wide shots.
CodeFormer
CodeFormer is another highly aggressive face restoration algorithm. While GFPGAN attempts to maintain the original aesthetic of the face, CodeFormer completely redraws the features to enforce hyper-realism. It is incredibly effective for fixing “zombie eyes” or misaligned jaws, though it can sometimes make digital art look slightly too photographic. Many Stable Diffusion user interfaces like Automatic1111 have CodeFormer built directly into their “Extras” tab, making it dead simple to run.
Photoshop Generative Fill
For professional creators, Adobe Photoshop’s Generative Fill offers the most surgical precision. If Midjourney outputs a great face but slightly mangles the teeth or one pupil, I just bring the image into Photoshop. Use the lasso tool to highlight the bad pupil, click Generative Fill, and type “perfect human eye.” Because Photoshop’s Firefly model is deeply integrated with the surrounding pixel data, it repairs the specific flaw seamlessly without altering the rest of your character’s face.
Frequently Asked Questions (FAQ)
Why does Midjourney mess up eyes so frequently?
I get asked this constantly. Midjourney struggles with eyes because they require absolute mathematical symmetry and complex light reflections (specular highlights) to look realistic. If the subject is small in the frame, the model simply lacks the pixel density to render the iris and pupil accurately, causing them to blur together or face different directions.
How do I fix AI faces in Photoshop?
It’s straightforward: import your image into Photoshop and select the Lasso tool. Carefully draw a boundary around the distorted facial feature (like a mangled eye or mouth). Click the ‘Generative Fill’ button on the contextual taskbar, type a brief descriptive prompt like “realistic eye looking forward,” and hit generate. Then just choose the best variation from the properties panel.
What is the best negative prompt for fixing faces?
After running countless tests, my go-to universal negative prompt string for faces is: “asymmetry, mutated, deformed, extra limbs, poorly drawn eyes, crossed eyes, plastic skin, waxy skin, bad proportions, cloned face, missing facial features.” Using these constraints forces the AI to avoid common biological rendering errors.
Does upscaling fix bad AI faces?
Not on its own. Standard upscaling does not fix bad faces; it only makes the distorted pixels sharper. To fix a bad face, you must use an AI upscaler with dedicated face restoration capabilities (like GFPGAN or CodeFormer) or use a workflow like Stable Diffusion’s “Hires Fix,” which injects entirely new anatomical details during the upscaling process.
Can I fix a face in Midjourney without changing the background?
Yes. By clicking the ‘Vary (Region)’ button under your upscaled Midjourney image, you can use the lasso tool to mask only the distorted face. Then, type a highly detailed prompt describing a perfect face. Midjourney will redraw only the masked area while leaving your background completely untouched.
To be fair, none of these tools are a magic bullet. You’ll still occasionally generate a portrait that looks more like a melted candle than a human being. The trade-off for creative freedom is that you have to play the role of art director, constantly wrangling the AI back toward biological reality. But by managing your pixel budget, dialing in specific anatomical prompts, and leaning on restoration tools when necessary, you can largely eliminate the weird face problem. As models like Midjourney and Stable Diffusion continue to evolve, I suspect their inherent grasp of human anatomy will naturally improve. Until then, precise prompting is the only way to get the realism you’re looking for.
)